
Aquarium object detection #3 - Deploying YOLOv5 object detection with Gradio
Table of contents
This article is part #3 of a series about aquarium object detection
1. Introduction
Up until now, our focus has been on: data preparation and exploration (covered in article #1) and model engineering and evaluation (discussed in article #2). However, these steps are only a part of the machine learning project lifecycle. In most cases, the ultimate goal is to develop models that can be utilized by end users, which necessitates some form of model deployment. Even if our project is purely research-oriented, it can still be advantageous to provide stakeholders with a simple demo showcasing our work.
In this short blog post, we will explore a basic option for model deployment using Gradio by hosting our simple app on HuggingFace Spaces. While it’s not the best choice for production-ready model serving, it might be great for internal demos or project showcases.
2. Development in a local environment
In the first step, we’ll be deploying our application in a local environment to test if everything works correctly, before pushing it to the HuggingFace Spaces. Self-hosted sharing might also be a great option for internal demos when we can’t share our model publicly – an article covering different sharing options is available in Gradio documentation.
To build a basic Gradio demo we can follow the quickstart guide. A simple interface can be defined in a few lines of code and deployed by running:
gradio app.py
The deployed app can be accessed in a browser at http://localhost:7860/.
2.1 Our application
Let’s now develop code for our interface.
# app.py

import gradio as gr
import yolov5

# Prediction
models = {
    "yolov5s": yolov5.load("akbojda/yolov5s-aquarium"),
}

def predict(img, model_type):
    model = models[model_type]
    results = model(img, size=640)
    detection_img = results.render()[0]

    return detection_img

# Interface
title = "Aquarium object detection"

inputs = [
    gr.Image(),
    gr.Dropdown(["yolov5s"], label="Model", value="yolov5s"),
]

outputs = [
    gr.Image(elem_classes="output-image")
]

examples = [
    ["examples/ex1.jpg", None],
    ["examples/ex2.jpg", None],
    ["examples/ex3.jpg", None],
    ["examples/ex4.jpg", None],
]

iface = gr.Interface(fn=predict,
                     inputs=inputs,
                     outputs=outputs,
                     examples=examples,
                     cache_examples=False,
                     title=title)
iface.launch()
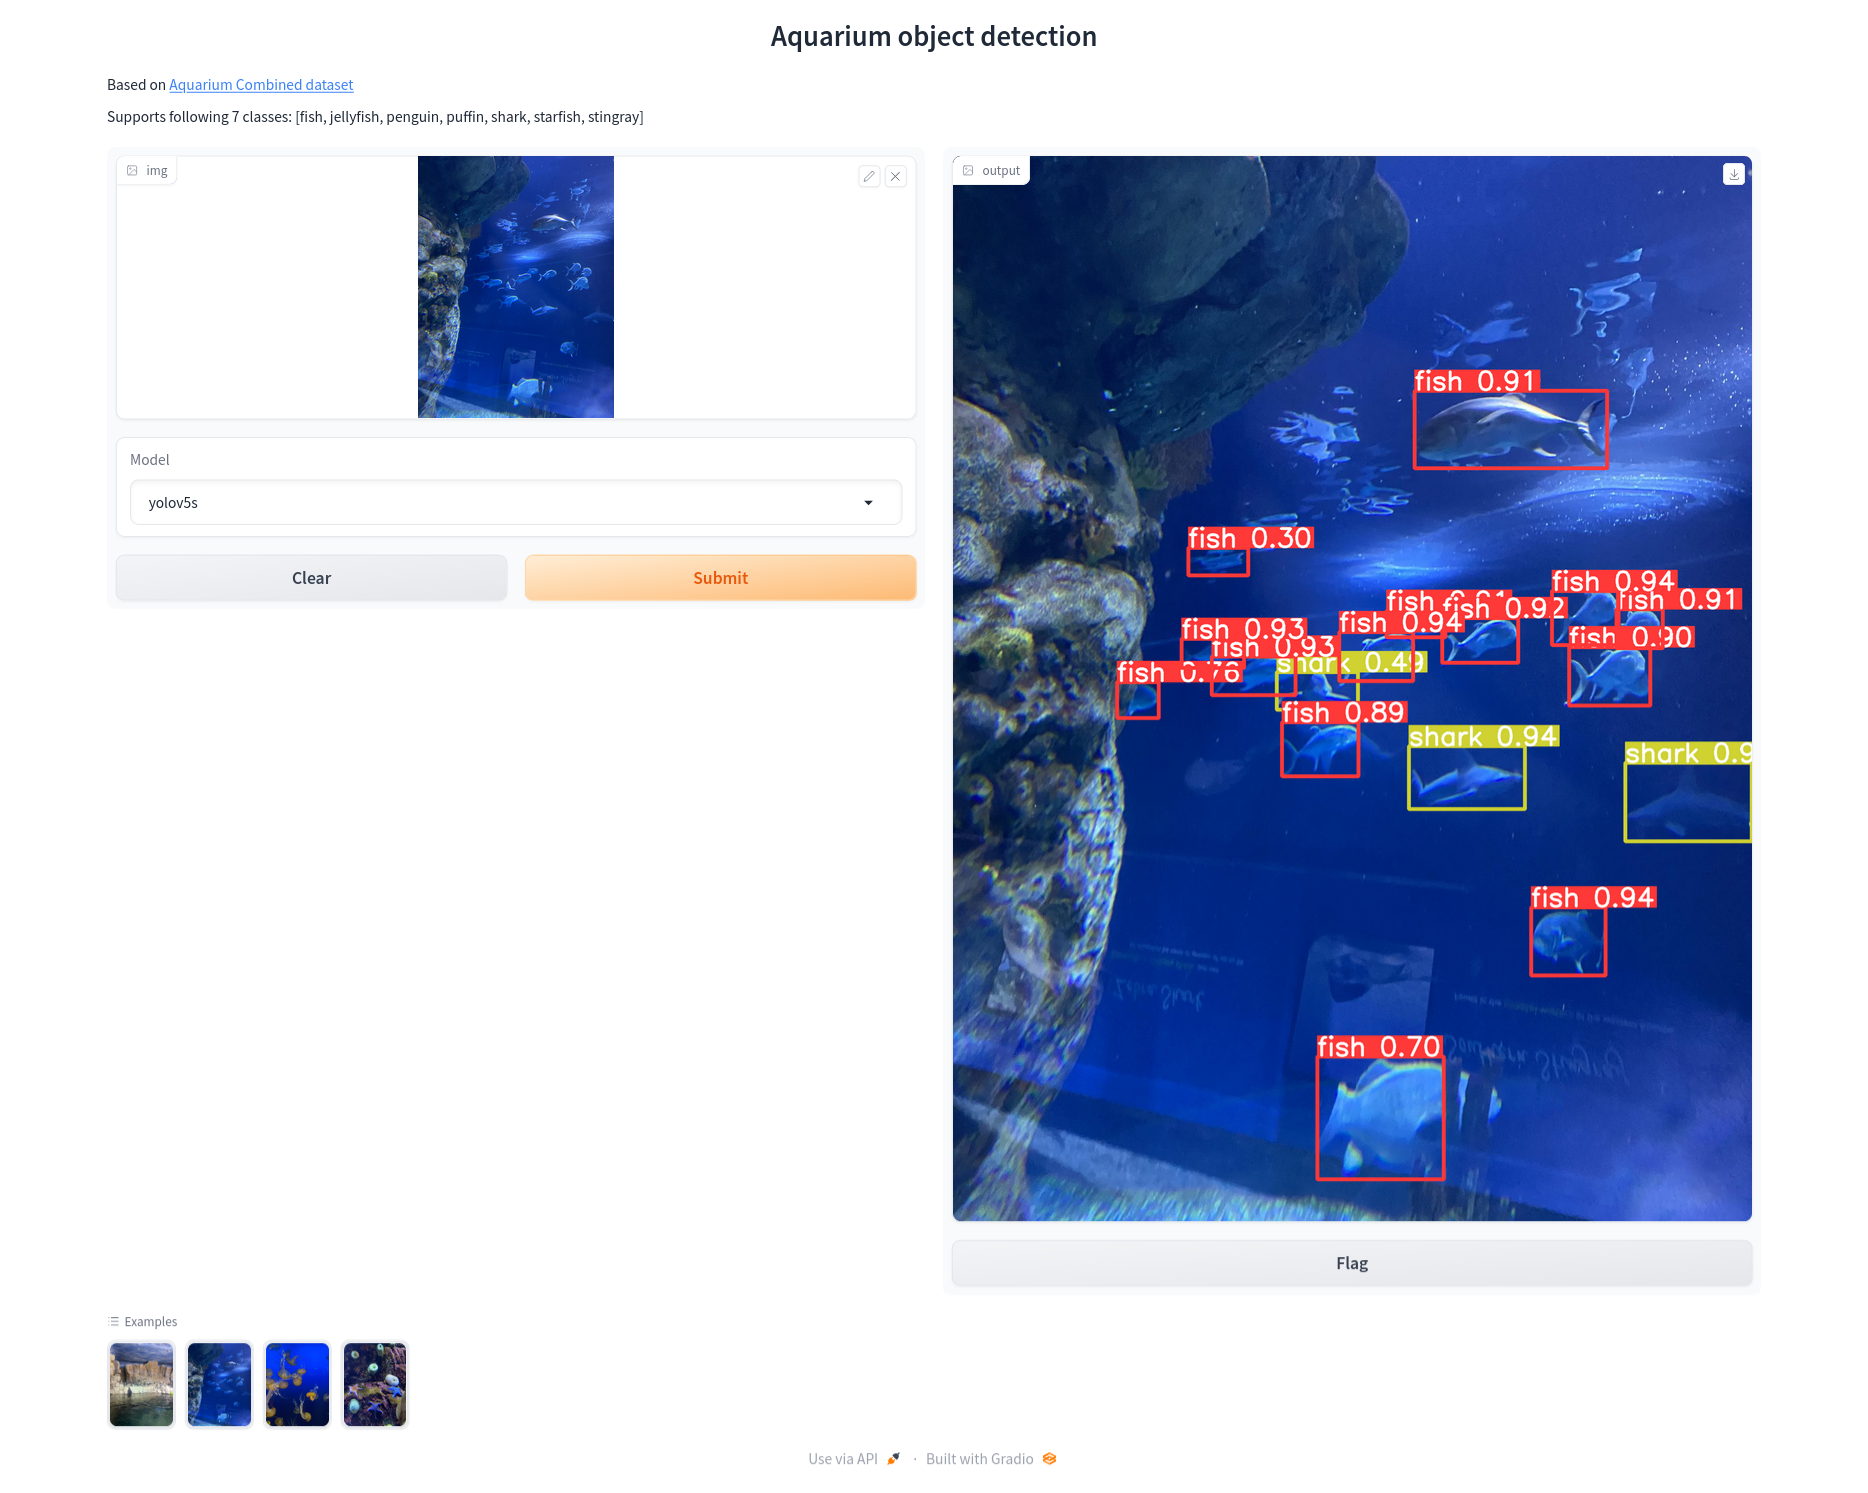
In addition to input and output images, we also define a dropdown menu for selecting model weights – we will add “medium” and “large” models later. We pre-load models and store them in a dictionary to avoid the need to reload the model for every function call. Pre-loading multiple (or larger) models might be problematic due to the limited GPU/CPU memory, but since we work with relatively small models and run inference on a single image at a time, it shouldn’t be an issue.
Below is a screenshot of the resulting interface where we run inference on one of the provided image examples.
2.2 Training medium and large models
As already mentioned, we want to compare the inference performance of YOLOv5 small, medium, and large models. In the previous article, we trained only a small model. Now, we’ll use the same training setup (obj=0.1, 300 epochs) to train medium and large models – training results are presented below.
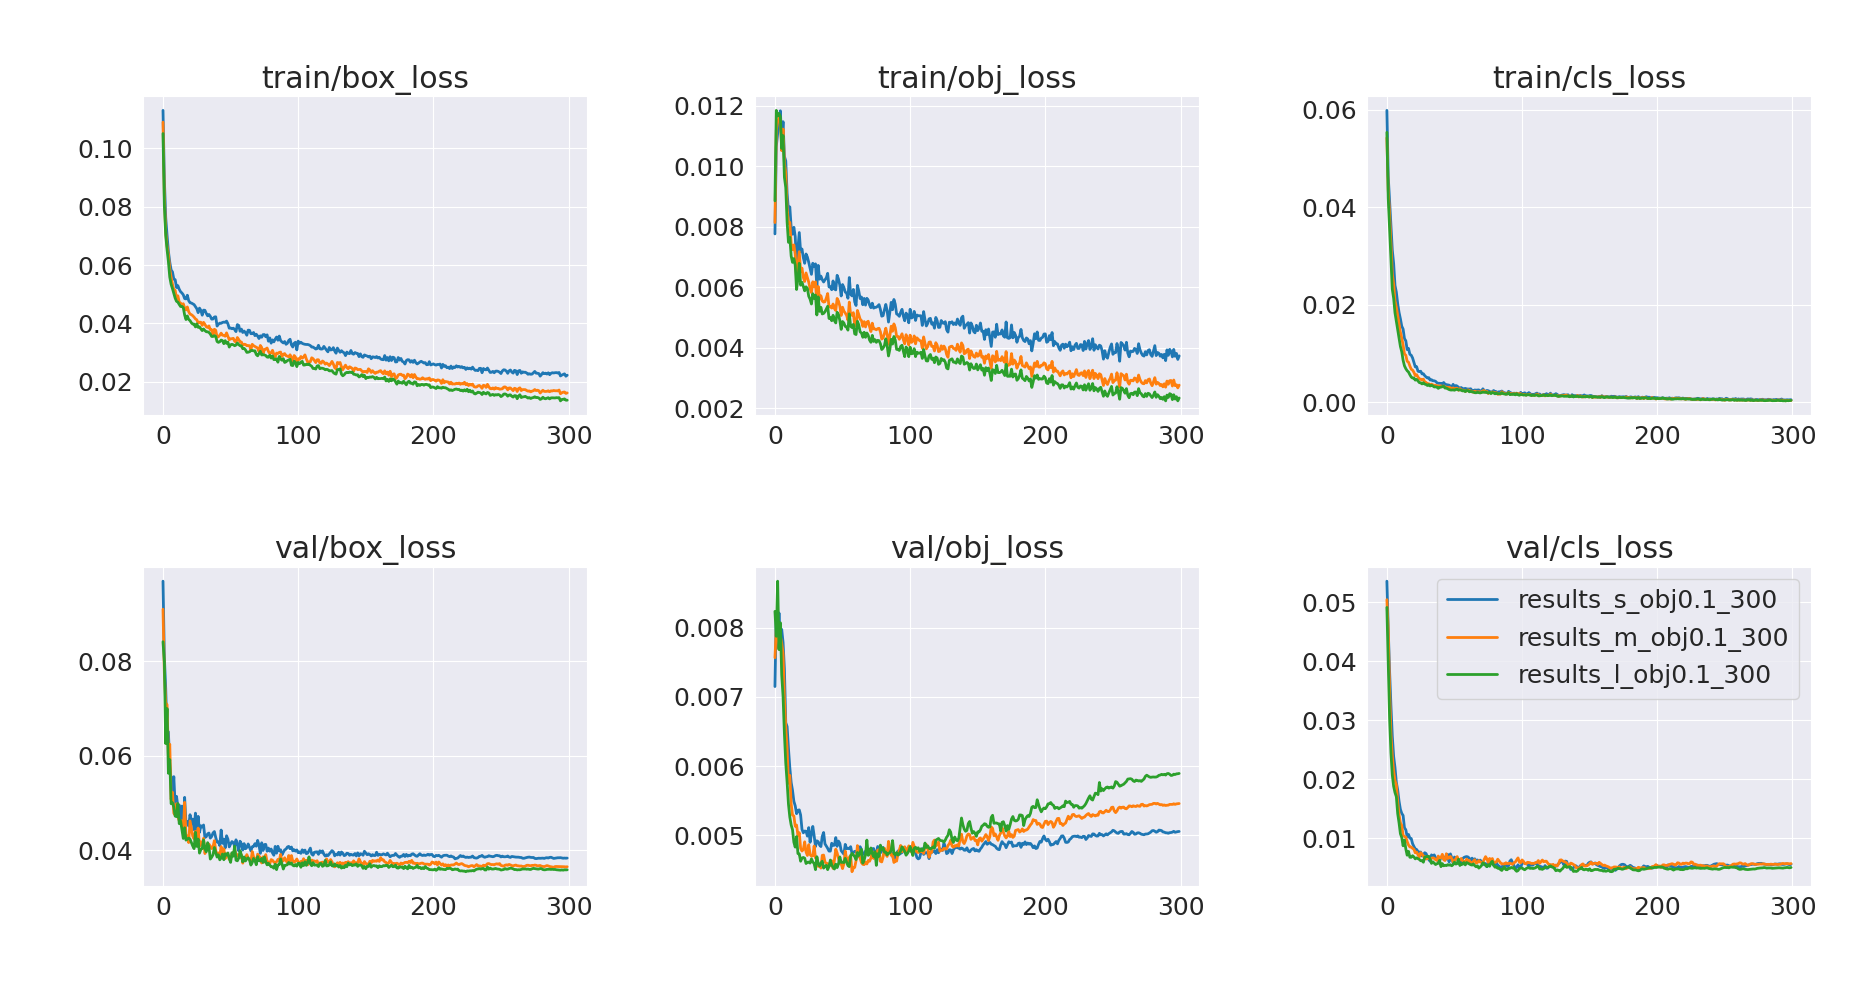
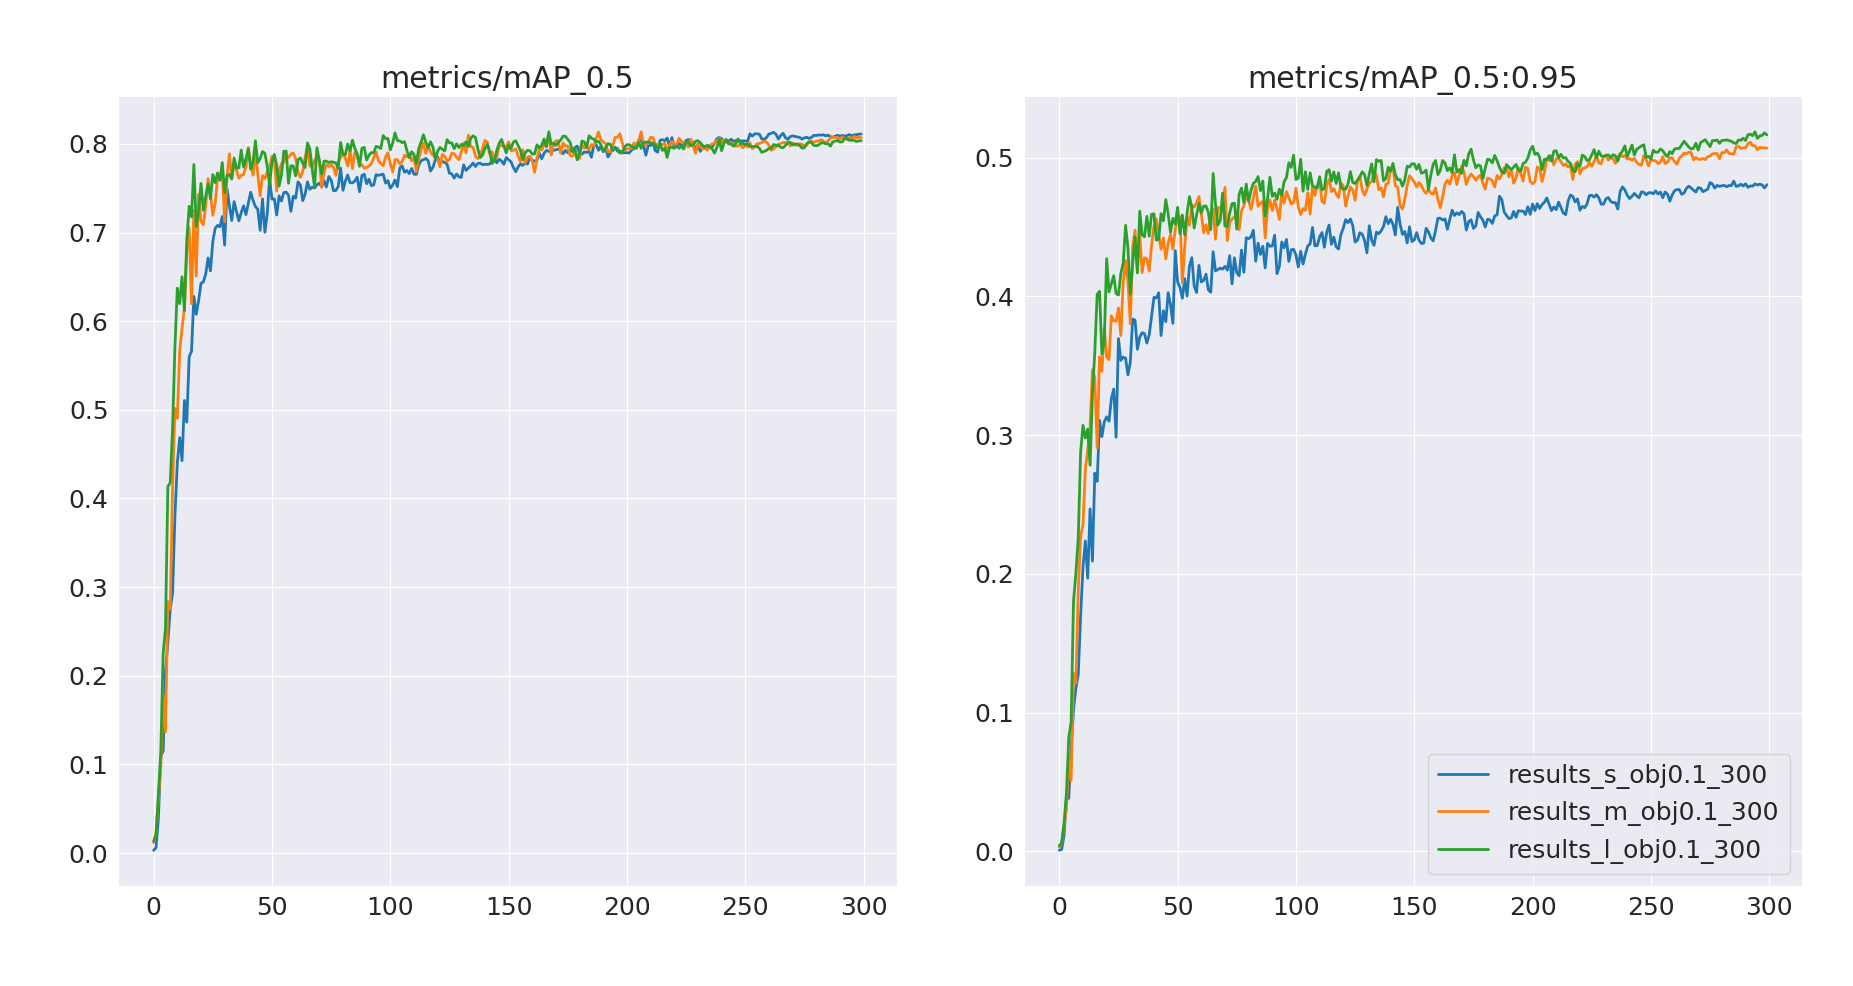
Validation mAP@0.5:0.95 gives us a rough estimate of how medium and large models performance improved compared to the small model. There is definitely room for further performance improvement – these new models seem to be undertrained and we can once again observe objectness loss overfitting. But we are not going to dive deeper into improving training since this is not the focus of this article – we just wanted multiple models to make the demo application more interactive.
We can upload the trained weights of all three models to the HuggingFace Hub:
- Small model weights – akbojda/yolov5s-aquarium
- Medium model weights – akbojda/yolov5m-aquarium
- Large model weights – akbojda/yolov5l-aquarium
This way, we can use YOLOv5 built-in HF integration to load weights just with a model name. The updated code that handles all three models looks like this:
models = {
    "yolov5s": yolov5.load("akbojda/yolov5s-aquarium"),
    "yolov5m": yolov5.load("akbojda/yolov5m-aquarium"),
    "yolov5l": yolov5.load("akbojda/yolov5l-aquarium"),
}

...

inputs = [
    gr.Image(),
    gr.Dropdown(["yolov5s", "yolov5m", "yolov5l"],
                label="Model",
                value="yolov5s"),
]
As we already trained additional models and tested our interface in the local environment, we can now focus on our main goal – deployment to HuggingFace.
3. Deployment to HuggingFace Spaces
To deploy the Gradio application to HuggingFace Spaces we can follow this introductory article, which can be summarized into 4 key steps:
- The easiest option is to start with a new space creator to generate configuration files, by providing i.e. Space name, SDK type and hardware to run on
- Obviously, we have to select Gradio as our SDK
- We can deploy our demo to GPU instances (costs $0.60 - $3.15 per hour), but since it is just a simple personal project we will choose the free CPU option
- Since HF Spaces are Git repositories, we can pull the created repository and add our
app.pyscript - We have to define the dependencies required to deploy the app
- We do it by providing a
requirements.txtfile - In our demo, we have only one dependency –
yolov5
- We do it by providing a
- When we are ready, we can push these changes back to the HF spaces to build and run the app
- This may take some time, especially for the first build
Deployed application is available in HF Spaces we created (it also allows us to view files as in the regular Git repository) or directly under this URL. Additionally, we can easily embed it on our website, as shown below.